PLEASE BE AWARE THAT NOT ALL JURISDICTIONS PERMIT THE GROWING OF TOBACCO PLANTS. THE ONLY ONE THAT I KNOW THAT DEFINITELY FORBIDS GROWING IS AUSTRALIA (BY A LAW DATED 1911, WHICH FORBADE THE TRANSPORT OF SEEDS AND SEEDLINGS!), BUT YOU SHOULD CHECK FOR YOURSELF.
INTRODUCTION.
The last version (2013) has become out of date and has become far too long and full of fiddly detail about experiments of one sort or another. This is a slimmer version, but will still cover methods which are simple and which a person might wish to use to start with if they just want to try growing a few plants and do not want to spend much money.
Apart from my own experiences, I have drawn extensively from sources on the internet. These are acknowledged.
If the reader would like to see something about the lies and trickery which The Tobacco Control Industry has engaged in, go to:
https://boltonsmokersclub.wordpress.com/
In the sidebar there are links to a number of blogs which are supportive of smokers (and vapers).
===========
I am writing this from the northern hemisphere, therefore when I say ‘Spring’, for example, I am referring to the months of March, April. Readers in the southern hemisphere need to adjust for their latitude. These plants can be grown successfully in quite northerly situations. For example, I have seen pictures of growing plants in Canada, Alaska and Scotland.
—–
When you decide to grow your own tobacco, you must decide what sort of tobacco you wish to grow. Cigar and pipe tobacco are different entities from cigarette tobacco. I will assume that anyone reading this wants to grow cigarette tobacco, since that it my own interest and what I know a little about. But, just as a matter of interest, I will mention this video which I found on Utube about the curing of cigar tobacco:
If you are serious about growing your own tobacco plants for cigarettes, you should watch that video. Its importance is in the fact that you should not try to emulate their methods. The product which they wish to produce is high value/high cost Cuban cigars which are nothing like the product that we wish to produce. But watch it since it emphasises the need to cure tobacco. Even cigarette tobacco needs to be cured.
What is curing?
There seem to be a number of ‘myth-like’ stories about curing tobacco. A favourite is that seamen, carrying tobacco from America, noticed that bales of tobacco leaf fermented during the course of crossing the Atlantic. The result of the fermentation was that the tobacco leaves emitted a sweet smell (because starches in the leaves underwent a chemical change and became sugars). Smokers of this fermented tobacco found that the taste was much to their liking and better than unfermented tobacco. Thus the idea of deliberately fermenting tobacco leaves came to be. But there are variations on this story. It seems that there was a practice of transporting tobacco leaves inside used rum casks and that the leaves fermented in the casks and, at the same time, absorbed rum flavouring. It is important to understand that tobacco is very ‘hydrophilic’. Hydrophilic means ‘water loving’ – tobacco absorbs water readily. If there is also rum flavouring in the water, the tobacco will absorb the rum flavouring along with the water which carries the flavouring. Thus the idea of not only fermenting tobacco but also flavouring tobacco came to be.
Whatever the history might be, it became the practice to ferment the tobacco leaves deliberately at the source rather than leaving it to chance. Thus, tobacco growers in America built special barns with temperature and humidity controls which created the optimum conditions for the fermentation of the leaves to occur. Once cured, the tobacco can be packaged, stored and transported with ease. We would have great difficulty in emulating these methods, since we do not have the same climactic conditions. It is no accident that the best places to grow and ferment tobacco leaves occur in a belt around a position a little north or south of the equator, including the Southern States of America, Zimbabwe, India, China, and many more. It is a question of economics for Tobacco Companies. Here is a video of the collection of tobacco leaves from a plantation in India. Only the first few seconds, showing the stripping of tobacco leaves from plants, is important to us, but watch it all if you want to:
Compare that with this video from Switzerland, where the leaves are being stripped by hand:
From a Tobacco Company point of view, which process is likely to be most economical?
So the Tobacco Company processes of curing tobacco are difficult for us to emulate, so we would be better off using our own methods. Here is a quote from a site which illustrates the methods that Tobacco Companies use – be sure to note the way in which the temperature in increased in a controlled manner over a few days:
In general, curing can be divided into three distinct stages: yellowing, leaf drying, and stem drying. The first stage can be described as a period of major chemical conversions and color development. Air temperature in the barn is maintained between 30 and 40°C, with relative humidity of 80 to 95%, (5,12) for about 48 h or until the leaves turn yellow. In the second stage, air temperature in the barn is increased gradually to 50 or 60°C, while relative humidity is lowered to allow more rapid moisture removal. This stage lasts for 36 to 72 h (12). The last stage (stem drying) generally requires 36 to 48 h. Air temperature is increased to 74°C with further decrease of relative humidity to permit rapid drying of the midrib.
[Source: http://www.tobaccoscienceonline.org/doi/full/10.3381/0082-4623-44.1.51]
Do we have the resources and staff to control the temperature, ventilation and humidity in that way? Can we even create such temperatures? The only alternative is to take a longer time at lower temperatures etc, but it is all a bit hit and miss.
Having said that we should not try to emulate Tobacco Companies, many people do build their own ‘curing chambers’ (sometimes known as ‘kilns’). There is nothing complicated about these structures. I have seen instructions on how to build one out of polystyrene. It was about 3’ x 3’ x 5’ high. Another (described as a kiln) was a mere 2’ cube built from plywood. The problem with these chambers is that they need fans, heaters and humidifiers running all the time for weeks perhaps, which can be expensive. Fortunately, there is an easy way to avoid all this trouble and expense. (I have recently built my own chamber, of which more later)
Essentially, then, curing is simply fermenting – that is, causing starches in the leaves to turn into sugars by innate chemical reactions.How can we satisfactorily cure tobacco? We will see in due course.
But we must start from the beginning.
——–
TOBACCO SEEDS.
December/January is the time to prepare your planting plot for next spring. I should really start with ‘preparing your plot’, but it is understandable that people want to start with buying the seeds! So we will start with that, and think of the plot next.
[From time to time, I will name organisations and suppliers. I have no connection with these organisations at all, and so I am not plugging any of them. If a name pops into my head, I might mention it]
I obtained my first supply of seeds from Coffinails via the internet. That was in February-ish 2011. I paid about £10 for a special offer of three varieties of cigarette tobacco plant. The varieties were Virginia, Maryland 609 and Monte Calme Yellow. Each has slight differences, but only marginal differences, in characteristics. Each little pack had over 200 seeds each, since the seeds are very small – about ½ a millimetre across. Amazing, isn’t it, that the plants grow over 5’ tall! The seeds came with instructions on how to germinate them and how to care for the seedlings, along with advice about tending the plants once they are planted out, plus advice about curing. Different parts of the world will have different climactic conditions and so it is not possible to recommend any particular varieties. It would be best to check the various sellers of seeds on the internet. I found out that Monte Calme Yellow plants are most used for cigar wrappers, so in 2012, I bought more seeds which were described as ‘Golden Virginia’. I think that they should have been named ‘Virginia Gold’ really, but I suppose that most people would be able to identify with the phrase ‘Golden Virginia’ as a type of rolling tobacco. The main thing is that the seeds were Virginia. I read in Coffinails that plants tend to produce seeds which bear characteristics of the soils in which they are grown. In 2013, I used seeds from my plants grown in 2012; last year, I used seeds from my 2013 plants; this year, 2015, I’ll be using seeds from last year’s plants. So I am now on my third generation!
GERMINATING THE SEEDS.
Precisely when should you germinate? The main criterion depends upon when you intend to plant them. If you are planting outdoors, then you need to be sure that there is little or no danger of frost. Where I live, early to mid May is the best time to plant out. The seedlings need a couple of months to grow big enough to plant out, so I’ll be germinating them early in March.
Here is a tip. The seeds are extremely small, and so it is difficult to sow them in small numbers. What I did was to shake some seeds out of the packet onto a sheet of plain, white paper. A4 size should do. It is thus much easier to see the seeds. My propagator were already prepared with each ‘cell’ filled with damp compost, so it was an easy matter to separate small groups of seeds from the pile (I didn’t actually count the seeds – probably about ten). I brushed/shoved the little group onto another sheet of paper and, from there, into each cell of the propagator in turn, one cell at a time. Don’t forget to observe closely which cell of the propagator you have just done! I use a little stick which I move from cell to cell of the propagator as I go along. The seeds do not need to be buried – just let them fall onto the surface of the compost.
My propagator is a simple, unheated one with forty cells:

The pic is just for clarification. It has a lid!
To germinate, the seeds need to be in a warmish atmosphere. I put the propagator on a shelf in the kitchen which is over a radiator. The shelf gets warm and warms the propagator and its contents. Last year, I bough a heated propagator, so what I do now is still sow my seeds in the old, unheated propagator and put the whole thing into my new, heated propagator:

Unfortunately, at the beginning, I personally had a disaster. I was already late since I knew no better. It turned out that the compost that I was using was ‘sour’. That is, it had been lying in the garage for years and had dried out completely, thus rendering it very concentrated and acidic. The seeds germinated ok, but died a week or so after germination. It was only when I remembered that lupin seeds had suffered the same fate that I realized that it was the compost that was the problem. I started again with brand new ‘seeding and cuttings’ compost, and, this time, there was no problem – the seeds germinated and thrived.
But I was curious. I wanted to know whether or not a ‘propagator’ was really necessary. So, just as an experiment, I filled several 2” plant pots with my old ‘sour’ compost. I put the pots into an old washing-up bowl and sprinkled seeds on the top of the compost. I then covered the bowl with a hot, damp towel. After about five days, the seeds germinated! This proved to me that there is no need for propagators at all. Seeds can be sowed straight into pots. All they need is a warm, damp atmosphere, and they will start to germinate in about five days. Here is a pic:

However, we must bear in mind that using my garden soil was just an experiment. It is much wiser to use a ‘seeding compost’. Rose recommends John Innes No3 LOAM based compost. I use just general compost. It seems to be OK.
It takes only about five days for the seeds to start to germinate. Once they have germinated, the seedlings will be ok in normal everyday temperatures. Try to avoid watering them for a few days to allow the roots to dig in a little – the seedlings are likely to be barely attached to the soil/compost at that stage. If necessary, mist them using a fine spray.
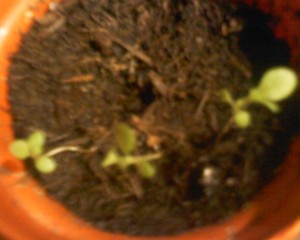
This is what the seedlings will look like after a few days:

At that point you can start to thin them out. I use my fingers to grip the weaker-looking seedlings which are close together and gently pull them out. I like to leave about three well separated seedlings in each cell of the propagator or in each pot. After about another two weeks, you can expect them to look like this:
At this stage, they grow very slowly. It is not a bad idea to gently top up the soil/compost to be level with the bottom of the leaves.
If you use a propagator, then you will have to transplant the seedlings into pots. It may be as well to let them grow in the propagator until they are reasonably big:

The bigger one in that pic is about 2″ (4 cm) across. Transplanting the seedlings into pots is not is difficult at all. Simply use a teaspoon to ease the seedling out of a cell of the propagator. Gently does it because the seedlings might have longish taproots. Make a hole in the compost in the pot with your finger and slip the roots of the seedling into the hole. Put the seedlings deep into the hole – right up to the bottom of the leaves, and press the soil in around the hole. Ensure that compost is damp. I poured very hot water into the compost-filled pots to raise the temperature and to kill off bugs. Of course, I allowed the compost to cool right down to room temperature before putting the seedlings in!
When I started my seeds off in 2013, I had a disaster. Although the seeds had germinated without trouble, they failed to develop. For weeks, they sat in their pots, about a centimetre tall with a couple of little leaves, but did not grow. I had tried to speed up the process by warming up the pots. That was a BIG mistake. I have found out since that tobacco plants will die if the temperature of the soil is above 40° C. 40C is not a high temperature – it is just warm. I made a mistake by trying to increase the warmth of the seedlings in the mistaken belief that they would benefit and grow better. They did not. Instead, they began to die. I had to start again and succeeded on the second attempt. On that attempt, once the seeds had germinated, I put the propagator on the window ledge in the spare bedroom which faces South. The radiator will keep the room at a temperature of about 20C, which is fine. Yes, the plantlets will grow very slowly, but we must remember that the seeds are extremely small and the roots are also extremely small until the plants gain strength, which takes some time. So the order of the day is, “Patience, Friends!” In general, ordinary room temperature is fine.
That’s about it for dealing with the seeds and seedlings.
PREPARING YOUR PLOT.
There are three possibilities that occur to me.
1. You live in a flat or apartment without balcony.
2. You live in a flat with balcony, or you live in a ‘maisonette’ or house with very little garden space.
3. You live in a house with sufficient garden space to create tobacco plots.
In case 1, you have no alternative but to grow tobacco plants within your home. In that case, the only limitation upon how many tobacco plants you should grow is how much space, within your home, you are prepared to grant to the plants. They are big plants. That is for you to decide. I have been advised that the big problem with growing indoors is the lack of light. As an experiment, in 2013, I grew three plants in buckets of compost on the South facing window ledge. The plants grew through their life-cycle, even unto flowering, but they were small. The biggest leaf was no more that 12″ in length.
But do not be deterred! You need experience! In your first year, especially, you must take it as it comes. A lot depends upon how much you smoke, with all the implications which come with that thought.
In case 2, tobacco plants will grow happily in buckets. Remember that tobacco plants are, generally speaking, ‘annuals’. That is, that they have to be started from scratch from seeds every year. Here is a picture (courtesy of Leg Iron) of a plant happily growing in an ordinary bucket:

I have since learnt that there are important considerations when growing plants in buckets. First, the growing medium (the ‘soil’ in the bucket) must be loose enough not to become compacted. Ordinary garden soil is too ‘dense’ in itself. In such a dense medium, especially when confined in a bucket, the roots of the plants cannot push their way into the soil. The best bet is to use only compost, I should think. I saw a video (which I have since lost) which showed plants growing really well on a balcony in pots/buckets. Perhaps extra fertiliser is the answer, but I don’t know.
In case 3, the whole situation changes. It all depends upon how much of your garden you are prepared to ‘sacrifice’. In my own case, I found that I had an area which was ‘available’. It had shrubs growing in it, but not such as to be more than ‘eye candy’, and not very pretty ‘eye candy’ at that. But I had to do the work involved in clearing the area. I cleared an area some 18 feet by 5 feet, sufficient for about 30 plants.
———
In cases 1 and 2, there is no plot preparation problem since there is no plot. Essentially, you just grow your seedlings until they are reasonably big and then bung them in buckets full of compost. No problem. But in case 3, in order to produce the best yield, it is worth your while to give the matter of plot preparation some consideration.
I can only describe what I personally have worked out.
Remembering that I ‘allocated’ a plot of some 18 feet by 5 feet, I turned the ground over and removed weeds and such. When my seedlings were reasonably big, I planted them. There was enough room for about 30 plants.I also spread slug pellets around. I shall show you a pic of the result after a couple of months:

Notice that there is good growth on the left (the white thing is a 12″/30cm ruler), but on the right and at the back (the top of the pic), the growth is pathetic. WHAT WENT WRONG? My answer is that I did not prepare the ground adequately. When I ‘turned it over’, I did not dig deep enough. I did not loosen the ‘subsoil’ sufficiently. I did not ‘de-compact’ the soil. My plants never had a real chance of putting their roots down. I did not ‘fertilize’ the ground. I did nothing in preparation adequately. Nevertheless, I did get a reasonable crop.
Towards the end of that first year, I extended the plot:

As you can see from the position of the silver birch tree (top of pic) I have cleared a load of useless shrubbery and expanded the plot a great deal. Now look at this pic:

All the plants had been harvested and the stalks removed. But what is important is that I had DOUBLE DUG the plot, thus opening up the soil to allow frost to enter deeply. The frost will freeze the water in the soil and expand. When the ice melts, millions of holes will appear in the soil and be filled with nitrogen from the atmosphere. The soil will be ‘conditioned’.
“Double digging” means that I have dug deeply and reversed the levels of the soil. The sub-soil has become the top soil. I do not expect to have to do this annually! There were 20 years of neglect to take care of and loads of shrubbery roots, and so on. By the way, my use of the word ‘subsoil’ is wrong. Correctly, it means soil which is below the soil in which plants grow, and is normally undisturbed. I use ‘subsoil’ only to mean ‘a lower strata’.
The best way to ‘double dig’ the plot is this:
Given that you have a plot something like the above plot, start at the furthest point away. Dig a trench across the plot. Put the soil from the trench on one side. Dig out a further ‘spit’ (a spade depth) out of the trench and put that soil on one side. Now start another trench alongside the first. Put the first ‘spit’ from the second trench into the first trench. Dig a second spit out of the second trench and pile that soil onto the top of the soil in the first trench. Thus, the ‘subsoil’ becomes the topsoil. Gradually work your way across the plot. The last trench will be filled with the soil from the first trench.
My good friend, Rose, told me that she liberally spreads manure over her plot each winter so that nutrients taken out of the soil by the plants are replaced. She said that she has never had problems in re-using the same plot year after year as a result.
I have been investigating the application of fertilisers. After some messing about, I came across the idea of bone meal. Now, the basic ingredients of fertilisers are N, P, K, standing for Nitrogen, Phosphorus and Potassium. A ‘general’ fertiliser will contain some average balance of the three elements. Bone meal has N and plenty of P, but no K. But K (potash) is readily available in wood ash. What is cigarette ash if not wood ash? So, I have been saving cig ash all summer.
As it happens, I have no need this year to ‘double dig’ since I did so last year. The main thing, this year, is to dig deep and add the fertiliser so that, come Spring, the soil is ready. I have made a start today, since the weather is quite pleasant. What I have done is merely dig deep and turn the soil over in big lumps, leaving deep holes. Frost will get deep into the ground. Also, when I spread fertiliser and cig ash over the plot, that too will fall into the deep holes to some extent and get washed in by rain.
THE PROGRESS OF SEEDLINGS.
The seedlings grow slowly. There is no doubt. It takes weeks for them to get to a size where the leaves are 2”/5cm long. Having said that, once your plants reach this stage and you plant them out, they grow like the clappers once they get going, provided that the weather conditions are good. But, in my experience, the rootballs of the seedlings are very small to start with. I checked several of them. This is why I think that 2” pots are sufficient. Here are a couple of pics of the root structure of the plants.
The first pic is of a couple of badly developed plants:

Rather pathetic. The roots of the 1st plant are only about 4″ (10 cm) long. Those two plants are from the group which did not grow properly, which I mentioned earlier.
The next pic is of a well-developed plant (though not nearly a fully developed plant):

You can see that they spread out and would appreciate depth of soil. Those roots are almost a foot (30 cm) long.
The only other consideration of significance is when to plant out, or put your buckets (plant pots) out if you are using a patio or a balcony.
The only important point is frost. New tobacco plants do not like frost one little bit. Hereabouts, I am aiming for mid May. A very important consideration is the temperature of the soil. There is little point in planting out if the temperature of the soil is less that 15°C. They will not die, but nor will they grow much. Better to keep them in pots and wait until the soil warms up.
I used an ordinary thermometer to test the temperature of the soil in my garden. I suggest that you do likewise. Just make a hole in the soil and stick a thermometer in the hole about 4 inches (10 cm) deep. Here is a pic of my thermometer:

It’s only about 6″ long, but perfectly adequate. When the soil temp gets to 15C, then that might be warm enough to plant out.
There is also another point. What is the point of planting out when the ground is cool and your plants will not grow much, and put them in danger from slugs and snails?
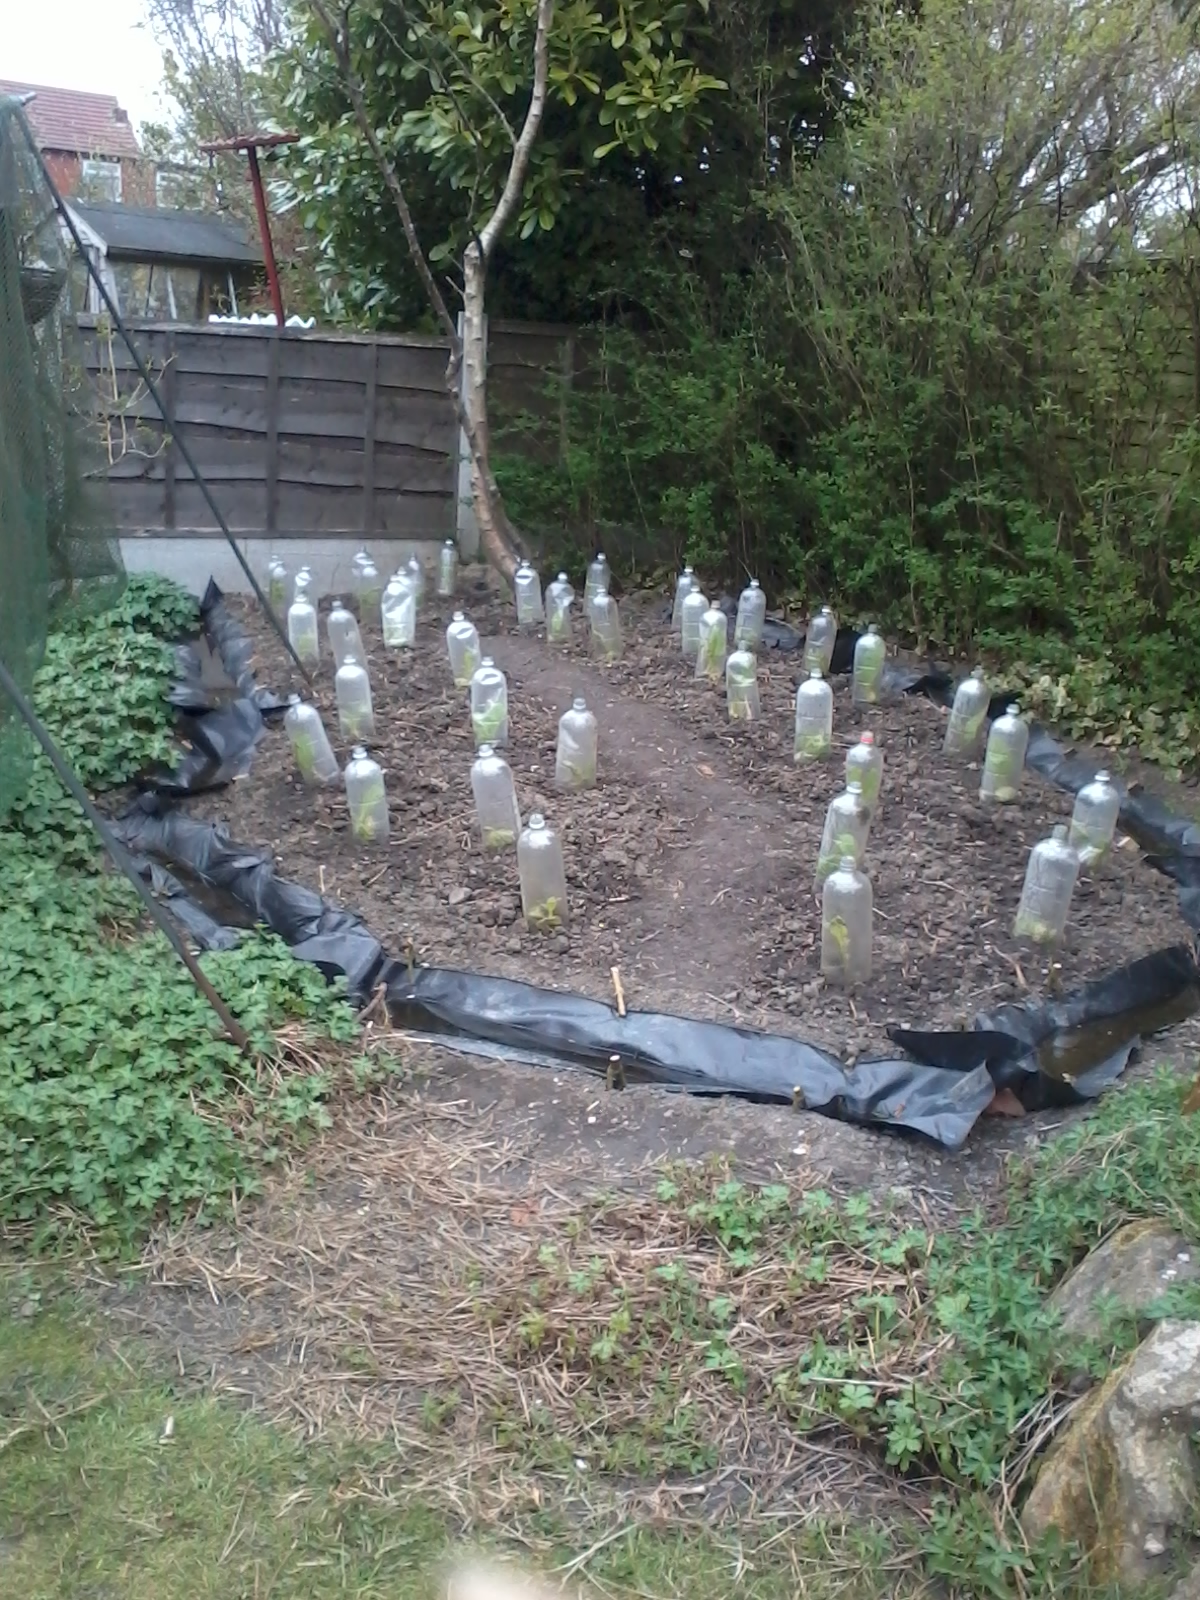
I saved empty 2 litre pop bottles. I cut the bottoms off, but left the top, including the bottle top, intact. When I planted out, I covered each plant with a bottle, forcing the bottle into the ground. That created a mini-climate inside the bottle. The bottles also protect against slugs:
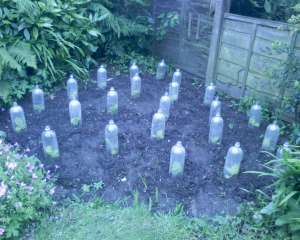
(That pic is of my Plot 2)
The pop bottles worked fine and certainly created the ‘microclimate’ and protected the plants from slugs, but the slugs and snails had a fine feast once I took the bottles off! I only found out what was happening around July when I went out about 2am and found, to my horror, that about 20 slugs and snails were munching away at my bedding plants and tobacco plants. To make things worse, it was the GROWING TIPS of the tobacco plants which they were eating. Before I investigated the question of how tobacco plants grow via the net, I thought that the stalks of plants extended, as the plants grow, all along their length. They do not. What happens is that plants grow taller by extending the growing tip. The stalk below gets thicker, but does not get longer. Thus, if slugs eat the growing tip, the plant cannot get longer. It will not die, but nor will it develop. It will try its best to grow, but will be stunted. I took it upon myself to solve the slugs problem by going out each night and searching for them. That does not mean that I was searching in the undergrowth! Slugs tend to slither out onto the lawn at night. All I had to do was to collect them up and kill them by squashing. I got rid of several hundred, young and old. Of course, I checked the actual tobacco plant leaves and was astonished at how many baby slugs were feasting on the leaves overnight.
To deter slugs, I dug trenches around the plot. Here is a pic:
Once the trenches were dug and levelled, then it is a simple matter to line them with plastic and then fill them with water. But it is important to keep a look out for slugs and snails (or whatever critters plague your local area). Last year, I was surprised to find baby slugs/snails inside the pop bottles! I can only think that they can from slugs eggs which had been laid in the ground. We had a very mild winter here last year:

Pretty little things, don’t you think? As soon as Spring arrives, I intend to spread slug pellets on the plots.
Be sure to water the plants in well when you plant out and keep them watered well for the first week or so. During the summer, there is not a lot you need do provided that there is a sufficiency of rain. If not, then water the plants from time to time.
THE HARVEST
And so we wait. The plants get taller and taller and the leaves get bigger and bigger. And you say to yourself, ”When can I start making tobacco then, for heaven’s sake!” There are all sorts of ways of harvesting. Remember the Indian leaf stripping video and the Swiss picking video? In both cases, the leaves (all the leaves in the stripping video and the leaves which were being picked in the picking video) had started to yellow, but they were not very yellow. They were still generally green. Rose has sent me this contribution regarding when the leaves can be picked:
“One of the skills of a Virginia cropmaster was the ability to judge just when the tobacco should be harvested. An experienced planter would look at color (a yellowish green), texture (thick, rough and downy) and pliancy (a leaf that broke when it was folded between one’s fingers).”
I have seen a recommendation that we should wait until the flowers themselves wilt and the seed pods start to form, which may be about 5 weeks (or much longer in practice!) after the flowers appear. By this time, the bottom leaves should have started to go yellow. It would be nice if that were to happen, but my experience has been that life isn’t that simple! Apart from the very early small leaves at the bottom of the plant, the leaves stayed stubbornly green.
I think that there comes a point, after the plants have been growing for several months, where you must decide for yourself. In my case, I noticed that the oldest leaves started to gain yellow or brown spots. I took this to be a sign that the leaves were beginning to deteriorate, and so I started to pick them. It certainly seems to have done no harm since the tobacco that I have made is fine. But it is hard to be certain. In general, I would say that if the leaves start to show signs of yellowing, then pick them. But there is plenty of evidence on the net that leaves are not necessarily expected to go yellow on the plant. Here is a quote from Brit Am tobacco:
“”The harvested tobacco leaf is then cured. This is a carefully controlled process used to achieve the texture, colour and overall quality of a specific tobacco type. During the cure, leaf starch is converted into sugar, the green colour vanishes and the tobacco goes through colour changes from light yellow to orange to brown like tree leaves in autumn.
Clearly, not a lot of yellowing can be expected on the plant.
Another tip is that the leaves are ready when they snap off easily. A little ‘catch 22’ there, don’t you think? How do you know if a leaf snaps of ‘easily’ unless you snap it off whether it is ‘easy’ or not? OK. First, apart from the ‘lugs’ (the very small leaves right at the bottom of the stalk, which are the first leaves to appear and do not grow much) it is the lowest leaves which get biggest:

In the above pic, I have already harvested a couple of leaves from the centre plant with the ruler (30 cm). You can see that the lowest leaves are a little lighter in colour that the bottom leaves on the plant to the right. But you can also see yellow spots on all the leaves which are at the bottom of the plants. Note also that the centre plant is beginning to flower. So, when I say, “Try applying downward pressure at the junction of the leaf and the stalk”, I think that it is reasonable to assume that the leaves have reached a stage similar to the above. A picture tell a thousand words!” The lowest leaves in the above pic did indeed ‘snap’ off easily. In a way, it does not matter what month it is when the plants get to the above stage, but plantlets planted out hereabouts in mid-May will reach that stage around the end of August or September or thereabouts.
Only one of my plants flowered in my first year, but it was too late for the seeds to develop. Generally speaking, the recommendation is to ‘top’ the plants. That is, don’t let them flower or run to seed so that the energy of the plant goes into the leaves. Cut the flowering stems off. But I have also seen a recommendation to collect seeds from plants grown in your own soil which will be acclimatised to your soil. In 2012, I allowed a couple of plants to flower and go to seed. It is those seeds which I used in 2013; I used seeds from the 2013 plants for 2014. But it is suggested that you ‘bag’ any plants that you allow to flower. What that means is to cover the flower buds with some sort of fine mesh bag or something so that insects cannot cross-pollinate the flowers – especially if you are growing more than one variety.
And now for the biggy – curing the leaves. Wehey!
CURING TOBACCO LEAVES
I had a heck of a job in finding a simple, straight-forward definition of the word ‘curing’ as applied to tobacco. Only after I had read and read and read did I realize why that is so. The fact is that there is no one way to cure tobacco – there are several ways. Thus, the word ‘cure’ is a generic word. It is not dissimilar to the word ‘cure’ as applied to health. You can ‘cure’ a cold by taking lemsip I suppose, or by taking anti-viral drugs, and you can ‘cure’ broken bones with splints. ‘Curing’ tobacco depends upon what type of tobacco you want to cure and what the final product is intended to be. Do you want pipe tobacco, cigar tobacco, cigarette tobacco, snus, snuff, chewing tobacco, etc? Different treatments are required in every case. When I started to grow my own, I had no idea that this was the case. As far as I was concerned, tobacco is tobacco.
I would strongly recommend that you watch this video about curing tobacco for Cuban cigars again:
Again, I must emphasis that this process is not one for us to copy. Cuban cigars are high cost/high value commodities, and so lots of effort and time goes into their creation. In particular, I should remark upon the method of fermentation. The leaves are hung up in controlled heat, humidity, ventilation conditions to colour them. They are then packed closely together in heaps and allowed to ferment. Then they are packed and stored for years, in order to let them mature. Do we want to take years to make the stuff and wait for years to enjoy it?
There are ways to circumvent delays, which I will go in to shortly.
First, let me show you this statement about curing:
Tobacco can be cured through several methods, including:
- Air cured tobacco is hung in well-ventilated barns and allowed to dry over a period of four to eight weeks. Air-cured tobacco is low in sugar, which gives the tobacco smoke a light, mild flavor, and high in nicotine. Cigar and burley tobaccos are air cured.
- Fire cured tobacco is hung in large barns where fires of hardwoods are kept on continuous or intermittent low smoulder and takes between three days and ten weeks, depending on the process and the tobacco. . Fire curing produces a tobacco low in sugar and high in nicotine. Pipe tobacco, chewing tobacco, and snuff are fire cured.
- Flue cured tobacco was originally strung onto tobacco sticks, which were hung from tier-poles in curing barns (Aus: kilns, also traditionally called Oasts). These barns have flues run from externally-fed fire boxes, heat-curing the tobacco without exposing it to smoke, slowly raising the temperature over the course of the curing. The process generally takes about a week. This method produces cigarette tobacco that is high in sugar and has medium to high levels of nicotine.
- Sun-cured tobacco dries uncovered in the sun. This method is used in Turkey,Greece and other Mediterranean countries to produce oriental tobacco. Sun-cured tobacco is low in sugar and nicotine and is used in cigarettes.
Interesting? Yes, but all these methods are applied in bulk. As small producers, they are time-consuming and/or expensive for us.
Let me show you a couple of pics:

That is ‘sun curing’ in Iran. Erm….just a minute……is that snow on the ground? It looks very like snow to me! Here is an enlargement:
http://en.wikipedia.org/wiki/File:Tobacco_drying_iran.jpg
Now then, if it is snow, what does that suggest? It suggests to me that, once the tobacco plants have grown, then the ambient temperature no longer matters. Frost and snow only matter in connection with tender new plants. The harvested leaves will sit there, unaffected. When summer comes and the sun shines and temperatures rise, the process of ‘curing’ will recommence.
Now look at this pic:

That is a tobacco curing barn in Connecticut, USA. We can see, by implication, that very different methods of curing are being used. The first is simple and primitive, whilst the second is methodical.
A number of sites recommend hanging leaves in places like garages. Here is a video of one such:
The intention is to hang the leaves for as long as is necessary for them to cure themselves. But note that there is a fan running constantly! The fan is required to circulate air to avoid mould; mould can occur very easily in stagnant conditions. Mould spores float about in the air and, given warm, damp, stagnant conditions, can gobble up leaves in no time. Here is horror scenario about mould:
http://plantpath.ifas.ufl.edu/takextpub/FactSheets/pp0015.pdf
It seems that mould can be white, grey, blue, green, black…… Best to avoid it, don’t you think?
Damn it!
Look – one way or another, tobacco leaves have to ferment! If they do not, even though they may be yellow in colour, they will still be just unfermented leaves – like the leaves falling off trees in the Autumn. If the leaves do not ferment, they will not have the sweetness that is an essential part of the taste. Tobacco manufacturers ensure that conditions are just right, in terms of heat, air circulation and humidity, for fermentation to occur, even if the leaves are merely hung in barns.
Here is a quote from Tobacco Science:
Chemical changes mediated by enzymatic activity during the yellowing stage lead to the formation of desired compounds in the cured tobacco. Starch is converted into reducing sugars during yellowing and early leaf drying. As starch degrades, reducing sugar concentration increases and reaches its peak by the end of the yellowing stage. It then declines due to respiration, which oxidizes reducing sugar into carbon dioxide and water. Reducing sugars contribute up to approximately 22% of flue-cured leaf dry weight and are major components of cured leaf quality.
Chlorophyll degradation, noted by the disappearance of green and the emergence of yellow colors, is widely used to judge the curing progress. Full development of yellow color is often used to mark the end of the yellowing process, which is usually associated with completion of certain chemical reactions, especially starch to sugar conversions. This is possible because the degradation of starch and chlorophyll occur at about the same rate, although the reactions are independent. However, in some cases tobacco leaves appear yellow before desirable chemical changes have been completed. This might lead to low quality tobacco and a poor smoke taste.
The bold bit [my bold] suggests that you can have yellow leaves which have not fermented or fermented leaves which have not turned yellow!
Easy solution? Make sure that the leaves ferment!
There is another problem connected to just hanging leaves up and hoping for the best. Let me show you this flow chart (strictly speaking, the chart is about ‘casing’ (which seems to mean ‘putting moisture back into dried leaves’), but it will do:
[CLICK TO ENLARGE]

The only interesting thing here is the temperatures in the top line. 140 degrees centigrade! ‘American Blend’ tobacco (most fags) contains Burley tobacco which has been ‘toasted’ (see note under 140 degrees on top line). But look at the diagram carefully – it tells us quite a lot. Look at the left hand column – Burley tobacco,Virginia tobacco, reconditioned tobacco and stem (the mid-rib) tobacco. All go into the final mix. In 2011, I cut out the stems (mid-rib of the leaf) and chucked them. In 2012, I cured them as well. If you fancy curing the mid ribs, then it is a good idea to crush them . I used a rolling-pin. The rib is quite soft and easily crushes pretty flat. As it crushes, fluid is squeezed out. After a certain amount of experiment, I decided to cut out the mid-ribs and treat them separately because they carry so much fluid, even after they have been crushed. I have now decided that the mid ribs are just not worth bothering with. They contain so much fluid and sap that, after they have been dried, they are reduced to what amounts to hard twigs.
My suggestion is to cut out the mid ribs and bung them on your compost heap. If we cut out and dump the mid ribs, then we have no need to advance temperatures beyond about 49C at most.
I referred earlier to building a kiln out of plywood. Here are instructions courtesy of Seedman:
http://www.seedman.com/wkiln.htm
Or you can build a ‘curing chamber’, courtesy of Coffinails:
http://www.coffinails.com/curing_tobacco.html
I wouldn’t imagine that the cost of materials would be particularly great for a handyman, but running costs could be significant, unless you are curing a decent amount of stuff.
BUT ALL THESE COSTS AND PROBLEMS CAN BE AVOIDED!
THE METHOD OF CURING.
My first efforts involved my ‘yellowing box’:

I had this bright idea that I could maintain a temperature of some 30C and at the same time, maintain a high humidity. The idea was to have an electric fan heater blowing slightly downwards onto the surface of a pan of water. Inside the box, the air temperature would be about 30 c but moist. IT DID NOT WORK, although the idea was valiant. Idea discarded.
My good internet friend, Rose, pointed out to me that good results could be achieved simply by wrapping the leaves inside a ‘fluffy towel’ and putting the bungle on a warm, sunny window ledge (inside the house, of course). Mature green leaves will turn yellow after a few days. The problem was that, when I tried it, I found it wanting – the one leaf that I tried that method with dried out all right, but it remained obstinately green. But, on Rose’s recommendation, I tried it again, this time with several leaves. The result was astonishing. Here are some pics:

And again:

But note that the leaves have not become become yellow! They have gone from green to brown. Why? I don’t know. Maybe it is our soil hereabouts – it used to be arable land. It is black and carbon rich. Why should the leaves not turn dark brown when they have so much carbon in them? Remember that Virginia Tobacco was called ‘bright’ tobacco originally because it turned yellow and then a light brown as it fermented. It seems to have been a happy accident that this tobacco variety grew particularly well on poor, sandy soil. It produced a ‘light’ tobacco somewhat lacking in nicotine, which was to the taste of many smokers.
Here is another pic:
The colours are much better, but note that the mid ribs have were removed. I learnt only a lot later that the maturity of the leaves plays a big part in the colouring as the leaves dry. So what has happened to the leaves, apart from changing colour? Have they fermented?
But before we move on to fermenting, let us look at the ‘towelling’ in a little more detail.
TOWELLING
NOTE THAT I HAVE NOW BUILT A CURING BOX WHICH I SHALL DESCRIBE LATER.
Before towelling, you will wish to clean the leaves. Detritus easily washes off. My procedure is to run warm water into a washing up bowl. I immerse one leaf at a time and rub front and back with my hand. It takes only seconds. I then stack them on the plate rack to drain somewhat. I am sure that you can imagine the situation. When I have finished all the leaves, I shake them to remove as much water as possible. I then spread them out so that the surface moisture can dry off. If the weather is warm enough, I peg them out on the washing line or spread them out on the lawn; otherwise I spread them out in the house. But I do not want them to dry out too much! Just to remove the surface dampness. Half an hour or so usually suffices.
There are two separate ways to use the towelling method. One involves simply putting leaves inside a folded towel and the other involves rolling leaves up in a towel. The first applies best to small leaves while the second is useful for large leaves.
The following is a completely new section since I have found that, for me, it is the best way. Here is a pic:

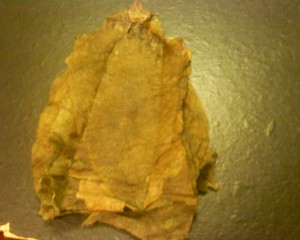
In that pic, I have folded a bath towel across and then along so that there are four layers of towel. The thickness of the towelling helps to absorb and hold moisture so that the leaves have time to yellow before they dry.
As you can see, those leaves are good, big leaves. Note also that the mid rib has been removed. (The mid rib is the big one that runs up the centre of the leaf. I call the thin ribs which run across the leave ‘minor ribs’) The way that I remove the mid rib is by using a board and a stanley knife. It is very easy.
As we saw, the leaves extend the whole length of the towel. So I fold the leaves over:

Now I roll the whole thing up, but the rolling might better be described as small folds to start with, which become a rolling action at the top. The whole is secured with an elastic band. smaller leaves can be treated in the same way. If they are small enough, then, when the mid rib has been cut out, you can stack the half leaves side by side in the same towel like this:

(I hope that you notice that those leaves are a nice yellow colour!) When I first started, I used to put the rolled up towels in the hot water cylinder cupboard. That worked well enough, but, eventually, I bought a heated propagator. Here is a pic:

It cost about £20. It is a simple machine. It does not have separate compartments. It has an electrical heating element in the base with a cut-out so that the compost in it does not get too hot. There are sliding slats on the top (the orange things) that you can open to let out damp air if you wish. It is large enough, being some 18″ x 12″ x 10″. Here it is (but I’m not sure that it is exactly the same one):
Used as a propagator, you would put a couple of inches of damp compost in it and sow your seeds in the compost. If you look carefully at the pic, you can see that I placed my old, unheated propagator inside. That is because the individual cells in the old propagator are useful. The propagator will maintain a heat level of about 30 degrees C.
The advantage of the propagator are that it controls the heat level within it, switching itself on and off as required. I could stack eight towels inside it at a push. Here is a pic of it in action:

The only problem with the towelling method was that the leaves yellowed inconsistently. Some leaves yellowed before others, and sometimes, I got the peculiar situation where the top of a leaf might be pale green, the middle yellow and the bottom brown. I got round that problem by opening the towels every day and moving the leaves around. That is, I separated the yellow leaves from the green ones and reassembled them so that those that were still green were in the same towel, while those that had gone yellow were in their own towel. Sometimes, I cut the part of a leaf which had gone yellow off and added that part to the ‘yellow towel’, and added the part which was still green to the ‘green towel’. Normally, nothing seems to happen for about three days then, quite suddenly, the green leaves will start to turn pale green and then yellowish, and then fully yellow. If they are left in the warmth, they will start to go brown. Here is a tip. If only a couple of leaves have gone yellow at the same time, you can take them out of the warmth and put them in another towel on their own in a cool place. At that point, they will still have lots of moisture in them, so they will keep, and stay yellow.
From a ‘work’ point of view, I never found the effort involved tiresome. In fact, since this is my hobby, I enjoyed it.
And so to the fermentation.
FERMENTING.
I came across a video on Utube which described ‘wadding’. Unfortunately, the video was removed ‘by the author’ (?). That was unfortunate because it was good. The process advocated completes the process of fermentation in a few days (in respect of the yellow leaves previously described). It can be done in as little as two days. The leaves are rolled up into wads. Every day or two, the wads are opened up. When the wads are opened up, a distinctly sweet odour can be detected. There is also another smell in there – possibly caused by the release of ammonia. The leaves become very sticky to the touch and turn decidedly brown. I called this process “WADDING”.
I am not going to go into it here because I only found out fairly recently that the author of the suggestions, although he called the leaves ‘tobacco’ was, in fact, describing cannabis. Enough said. Also, I have discovered that the fermentation is far too great for cigarette tobacco. But I shall briefly describe the process anyway.
Once the leaves have yellowed, they can be folded into a cylinder, rolled up and tied with string, thus:

(The above pic is the end product after a few days)
Fine if you want pipe or cigar tobacco, but far too intense for cigarettes.
So what to do about fermenting for cigarette purposes?
There is a clue, although I have not yet really thought it through or done the experiments.
I said earlier that leaves can go yellow without fermenting, like fallen leaves from a tree. The clue lies in a statement which I found in a book from about 1900. It states that ‘the early drying process’ adds to the ‘yellowing process’ as a determinant of fermenting. What this means, I think!, in practice is that the leaves are yellowed at, say, 35C. Once they are yellow, then the temperature is increased gradually to around 47C to dry the leaves and fix the colour, but that process completes the fermentation. The fermentation is partially done during yellowing, and completed during the drying. But that is only for cigarette tobacco, which is what this blog is interested in.
But there is still a lot of uncertainty…..
——
Because I really, really became intrigued by my hobby, I decided to build a curing box. Here is a pic:

I built it from the chipboard sheets of an old wardrobe which I had kept in the garage. Since I took that pic, I have insulated it with sheets of polystyrene:

It measures 40″ x 21″ x 17″. The lid is not hinged so that it can be lifted off entirely. The oblong in the front is a window. The flap at the bottom of the front is not hinged either. There is no point because, when I want to access the bottom of the box, I want to be able to do so easily. Here is a pic of leaves hanging in the box after a couple of days:

As you can see, the leaves are a nice yellow colour or a pale shade of brown. (They are suspended by paperclip hooks)
But there is a problem. I have not yet worked out how to ‘fix’ the colour properly. As the above leaves dried, they went browner and browner. But that is not unusual. We must remember that our soil is not the sort which is conducive to ‘bright’ tobacco. What is important, after all, is ‘THE TASTE’!
I ran out of leaves for experiments towards the end of last season. I shall have to wait until Autumn before I can start again. But I am very pleased with the results of using the box. Regarding the taste, on a scale of 10, accepting that, say, Silk Cut is 1 and Absolutely Foul is 10, my effort using the wadding method, as far as taste is concerned, was around 5 at best. The stuff produced using the box is around 2 or 3, which is not bad. Certainly, when I mixed a blend of 50/50 with cig tobacco, I got a nice taste with no harshness and little after-taste and fairly sweet.
What more can one ask for?
As I said, the box itself cost nothing to make, but I had to invest. I bought a ‘slow cooker’ (known as a ‘crockpot’ in the USA). It sits on the base of the box. It does not use much electricity. That is the source of heat for the box. Also, I bought a wonderful, Chinese thermostat. It switches the crockpot on and off according to the readings of a probe which is dangled inside the box.
I also bought a hygrometer, which gives the readings of the ‘relative humidity’ of the air inside the box. If the reading is too high, then a vent or something similar (opening the lid a little?) needs to be opened; if too low, than water can be added to the pot. But there is plenty of leeway because, generally speaking, during the yellowing process, you want the relative humidity to be as high as possible – around 90/95%. The leaves themselves provide that level of humidity at first.
One other thing. I raided an old computer and took out the fan. Here is a pic:
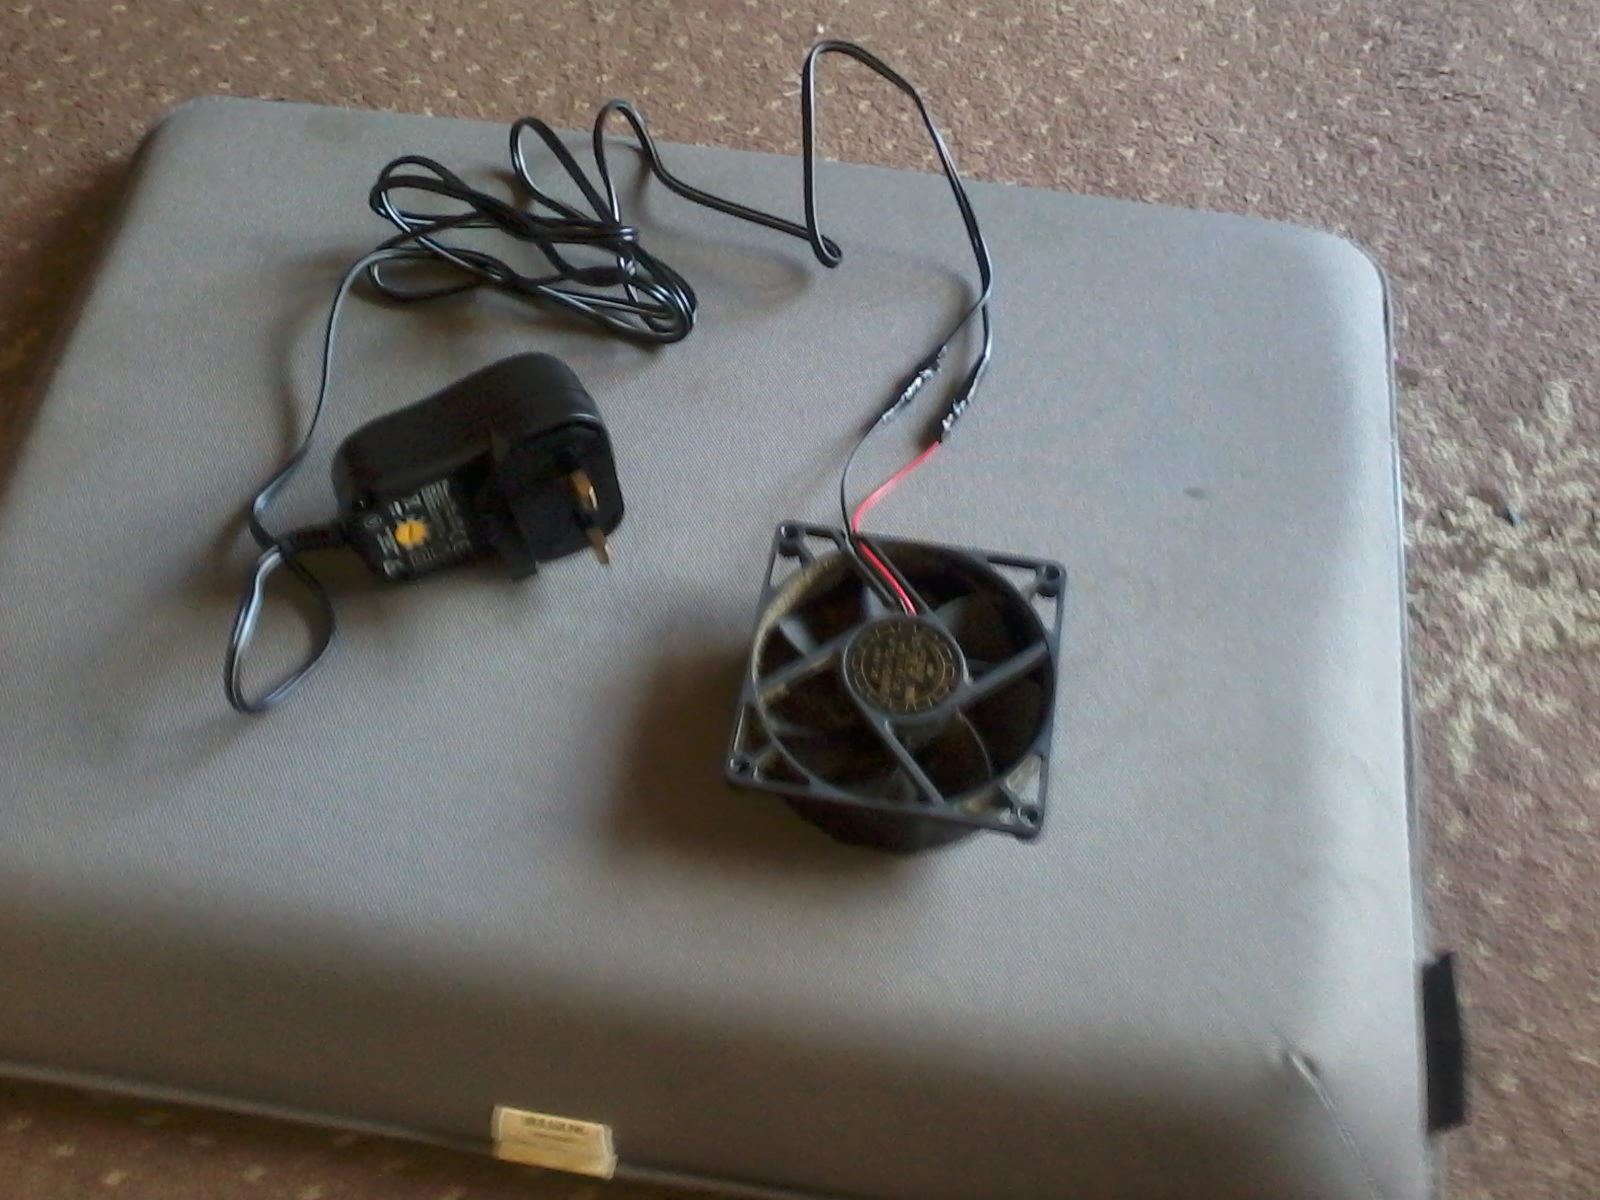
I glued the fan onto a flat piece of board so that it stood upright. It works wonderfully well in circulating the air in the box.
I cannot state a ‘dogma’ at the moment because, as I said, I ran out of leaves.I must wait until I have leaves later this year. However, here are some observations. Below is a chart:

Over a period of around five days, the temperature is gradually increased and the relative humidity allowed to fall by venting as required. (The only important lines, as far as we are concerned, are the continuous black line and the broken black line)
JB from Ireland and I have conducted experiments in tandem, more or less, over the past several months. She used an old chest freezer as her ‘box’. Other than that, she used much the same equipment.
One should observe that, if the mid ribs are removed, there is no need for the stem-drying part.
Needless to say, nothing is as simple as it seems. The control of the temperature is easy, but controlling the venting (and thus the relative humidity) is not simple at all. I have seen videos on the net where people have gone to a great deal of trouble to automate the venting. What I did personally is cut two V shaped notches at the top front and back of sides of the box. 
You can see the knotch in that pic. You can also see that my first experiments involved continuing to roll the leaves in towels and suspend the towels in the box. That method produced really nice yellow leaves, and I might return to it when I harvest leaves this year. Later, I cut two more smaller notches so that I could put two more rods in the box and double the capacity. I use the centre rod to hold the hygrometer in a position where I can see the readings through the window. I must get one with a probe this year – they do exist) You can see the extra rods in the pic higher up. there is one significant problem which is that the leaves tend to roll themselves around each other:

The problem, being that air cannot get inside, so that the inside surfaces of the leaves tend to dry more slowly and go brown for some reason or other. More experimenting is required.
But we must continue on the assumption that a person reading this has decided to stay with the towelling method (which is perfectly OK).
DRYING
I have to dispense with everything that I have previously described about drying yellow leaves. I am in new territory here myself to some extent. Bearing in mind that I was over-fermenting the leaves by wadding, when I dried the leaves, all I was interested in was getting them dry as quickly as possible. I spread them on the bed in the spare room in the sun. If part of the fermentation depends upon the drying method, then the leaves need to be given time. It may take some two days for the further fermentation to occur as the leaves dry. In which case, rapid drying is bad news. There is a ‘catch 22’ here. It is simple to hold the temperature at, say, 35C for a few days while the leaves yellow, but it is not so simple to slow down the drying while increasing the temperature to, say, 49C and at the same time stopping the leaves from drying too quickly! How can you increase the heat to dry something, and at the same time, slow down the drying? Perhaps we could imagine a person taking a shower with warm water while, at the same time, being blown with a fan of warm, dry air. It is a matter of balancing the heat required for the ferment and not letting the leaves dry out over the two days or so. But it is possible to envisage a different way. Why not let the leaves dry somewhat, and then mist them with water as required from time to time? There need not necessarily be continuity.
BUT IT CAN BE DONE! It was done long before there were tobacco companies.
In the meantime, it makes sense to try to harvest, as best you can, only leaves which are in the same state of ripeness so that they will yellow at the same rate and dry at the same rate.
I have no intention of abandoning the towelling method, despite having constructed the curing box.
I have some great ideas for experiments in Autumn of 2015 when I start to get produce. Bare in mind that the important thing is taste, and not colour. I’ll be posting updates on this site as I go along during 2015.
AGEING.
Again, this is a new topic. I have read that it is not unusual for tobacco which has been cured to be stored for three or four years before it is used to make cigarettes. Certainly, in my own experience last year, it did no harm to store my cured stuff for several months before using it as part of a blend. There are methods to age ‘raw’ tobacco quickly, but I am not sure. The idea of suspending leaves in 70% humidity and about 55C temperature for a month fills me with horror at the possibilities of mould forming. I would hate to lose a whole year’s produce to mould. In any case, I have no problem, in my mind, with the idea of waiting. I have my stuff in sealed plastic boxes. Every few days, I open the lids and let the smells out. Some sort of chemical reaction is still going on because the smells return. Ideally, one would continue this process until the smells disappear. It does not seem possible to speed up the process without the risk. By March of 2015, some of my stuff will be eight months old. My experience in the last three years is that patiently waiting for a few months before using the stuff pays dividends.
But there are other unexplored idea such as ‘toasting’. That can be achieved in an ordinary oven. The idea would be to shred and chop the tobacco into small pieces, spread the stuff on a baking tray and heat it up to quite a high temperature. It would become brittle, but can always be re-moisturised by spraying with water. My personal method of moisturising dried stuff is by placing orange peel on the surface of dry tobacco contained in a box:
https://boltonsmokersclub.files.wordpress.com/2011/12/2013-02-07-11-23-38.jpg?w=300&h=225
(NB. That pic is one from the early days with little material to use!)
It is surprising how the tobacco absorbs the moisture (and the flavour) from the orange peel.
Flavouring itself is another area still to be considered. At this time, I have not explored the ‘flavouring’ experience, other than using orange peel as a ‘moisturiser’.
“Flavouring tobacco” is a new area. For some 50 years or more, only tobacco companies have decided what flavours we smokers are allowed. Now, we can please ourselves, if we wish. Honey seems to be a favourite to some people.
MAKING CIGARETTES.
I realised early on that it is very unlikely that I will ever be able to grow enough to satisfy the needs of both my wife and me. I also had in mind that my stuff is very strong-tasting. So I decided to mix weak commercial tobacco with my strong stuff, half and half. I found the result very pleasant. Some people might have access, via the internet, to ‘whole leaf cured tobacco’, in which case, that stuff is ideal to mix with home-grown since Virginia whole leaf is quite mild.
I am sure that many people reading this will be adept at rolling fags, but I am not – never had the experience! So I had in mind to buy one of these:

But, while looking on ebay, I discovered ‘tubing machines’. I didn’t even know they existed! So I bought one – £5 for the machine plus one hundred tubes. Enough to experiment with:

I was disappointed when I got the machine to find that they are really only suitable for ‘expanded’ tobacco. Want to know about expanded tobacco? Read this:
http://www.bat-science.com/groupms/sites/BAT_7AWFH3.nsf/vwPagesWebLive/DO7AXG65?opendocument&SKN=1
(Scroll down to ‘Expanded Tobacco’)
Prior to taking up tobacco plant growing as a hobby, I didn’t even know that there was such a thing as expanded tobacco. Expanded tobacco is a massive rip-off of smokers. Cigs are not charged duty on their weight. Therefore, tobacco companies can reduce the weight of cigs as much as they like. In effect, that means that they can put smaller and smaller amounts to tobacco into cigs. The method is to ‘expand’ the tobacco by freezing it or forcing inert gasses into it to make holes in it. The frost is allowed to dissipate, or the inert gases are allowed to escape. the result is tobacco full of holes, and the consequence is cigs which burn down rapidly. Because there is no such thing as ‘consumer’ protection, tobacco companies can rip smokers off.
MECHANISATION.
In the recent past, I have ‘mechanised’ to the extent that I wish and need to.
First, I bought a shredder for about £20:

[The ruler is there only to indicate the size]
That shredder cuts the leaf into strips about 2 millimetres wide. I understand that you can get shredders which cut to less than 1 mm, but I did not see any on the net when I was looking. I am very happy with it because what I want is to end up with flakes rather than strips (see below).
Secondly, I needed some sort of machine to chop the strands into bits. I could not find a suitable ready-made machine and so I bought a cheap meat grinder/mincer for £7 on the net:

But I had to adapt it.
It was intended to mince meat and came with this gummage:

Meat is chopped and forced through the holes so that you get spaghetti-like strings of meat. That did not work with tobacco. The best that came out was just dust. So I got a piece of plastic and, by trial and error, created this extruder:

You can see the chopping blades behind the plastic. Since I took that pic, I have increased the size of the holes in the plastic still further, even though it was working well as it was. I cut more plastic out around the circumference so as to reduce dust. It is working very well. This is the result:

As you can see, the strips have been chopped into small pieces.
Finally, I bought an electric cig making machine. I bought a Powermatic 2. Here is a pic:

I have used it again and again and it works really well. You can find videos on Utube about how it works, so I shan’t go into detail. The tubes are very inexpensive. They work out at about one penny. I like Zen King Size Red. I find that ready-made superkings only last for about seven minutes. My home-made ones last for about fifteen minutes.
I see no reason to require any other machinery. Simple tools are adequate for the pursuit of my hobby.
CONCLUSION.
Tobacco plants can grow almost anywhere – in Canada, Alaska, Scotland, for example. Commercial growers will chose the places which are best, of course. The methods used to create the enjoyable substance known as ‘tobacco’ are many and various. Simple ingenuity will conquer.
I have thoroughly enjoyed my new hobby so far. Experiment and ingenuity is all you need.

Well done, and tons of good info for the beginner grower. If we only had had such a definitive site, with such information, when we first started out, it would not have taken 2 or 3 years to get to the point we’re out now!!
LikeLike
Thanks, JB. Our collaboration bore fruit, even if that fruit was to reveal that success is not as simple as it might appear to be in books!
I think that a little more elaboration might be helpful, but I don’t want to clutter up the text.
We’ll see.
LikeLike
I too have a Powermatic 2 machine (after a couple of years using a Top-o-matic hand crank). It worked brilliantly well for a few months then started to tear every tube I put on it, no matter what I did or which tobacco I used.
Finally in desperation I emailed the firm. WIthin 24 hours they got back to me to say all I needed to do was apply a thin layer of vegetable oil to the rubberized finger thingy that holds the tube onto nozzle. I have to admit I was more than skeptical as I had already tried applying a smear of silicon spray to it but I did as I was told-which was a major fiddle and pain in the butt to do.
I let the freshly oiled holder ‘dry’ for a few hours and then tried it out. No difference , it still tore every tube. So I went out and bought a couple of packs of UK Duty Paids and waited a good day and a half before giving it one more try before binning it. It now worked perfectly and has done ever since!
So word to The Wise: if your powermatic 2 starts to rip tubes OR leave a gap at the bottom of the tube then soak a strip of cornflakes packet style cardboard in veg oil for a bit and then use it as a ‘brush’ to coat the end of the the holder-finger-thingy.
LikeLike
https://www.yumpu.com/en/document/view/27831576/burley-curing-technology
Might be worth a read if you haven’t already.
LikeLike
Thanks for all the information, I shall have to give the towelling a try. I myself have just finished my second crop, not the best this year as the Scottish weather was abysmal this year. obviously bad most years but this year was the worst for a while. A very good read full of different ideas and thoughts. Thanks
LikeLike
Ta. Towelling works well, but don’t be surprised if immature leaves rot. Sometimes leaves which are very green in places will rot in those places but may be yellow elsewhere. Cut out the rotten bits and throw them away. By ‘rot’ I mean go black and soggy. Good luck.
LikeLike
Click to access tobacco_without_tears.pdf
Which was written by the Baccy Parson of Tilty, Hugh Cuthbertson, who set up the Tilty tobacco exchange and curing society (or whatever it was called). He famously opted to be sent to the Falkland Isles thinking they were off Scotland….but he also learned how to grow and cure baccy whilst in Chile. The Pathe Films listed in this link about him http://www.stgite.org.uk/media/cuthbertson.html are all on youtube.
My kind of preacher man, and possible candidate for the title of ‘father of English home growers’.
LikeLike
I have grown in greenhouse several plant’s of tobacco am now in process of drying in the day weather permitting seems to be going well the leaves are yellowing and turning a nice shade of brown I shall collect seeds as flowers die just like with flowers because cross pollination can through up some wonderful surprises nature is a wonderfull thing not to be always explainable maybe we try to put a stamp on it or change it I for 1 hope this never happens and people like me try to go alongside nurture maybe my efforts of growing the magic weed comes to nothing so who cares time well spent and enjoyed in the fresh air and away from the soaps on the box
LikeLike
I toweled and fermented as per article. I made some really delicious burley pipe tobacco. Thank you very much. I’m on Facebook and would appreciate any friends who manufacture their own.
LikeLike
I’m glad that it worked for you. Try to make sure that the leaves are mature before towelling. That means that they are a pale green tending towards yellowing a little at the tips of edges. If the leaves are dark green, they tend to go black and mushy.
LikeLike
Thank you for the great and very clear information you where willing to share with all of us.
I am determined to fabricate my own cigarettes in a short time.
I can source Burley tobacco in a bundle before is sold to the tobacco companies.
I am sick of paying so much taxes for a small pleasure where the money is blown in inconsequential items any way.
Thanks again.
Chris
LikeLike
You are most welcome, Chris. As you go along, you learn how to manage things better in your own circumstances. For example, I have now only one plot. I extended my Plot 1 because it receives the most sunshine and abandoned Plot 2 as ‘uneconomical’ in terms of temperatures of the soil and shade. I’ve just got my seedtrays down from upstairs ready for seeding.
What is important is to regard it as a hobby, and not to expect too much. I find growing the plants and curing the leaves to be an enjoyable pastime.
LikeLike
Thanks for your reply!!
I’ll keep in touch and let you know how my project advances.
Best regards!!!
LikeLike